Gasology's Design manager gives merchants powerful tools to design fuel prices for today with flexibility and control.
In this article, we explore how to build and create prices for your products for today. Prices for today are also referred to as spot prices.
First, make sure you have selected the facility from which you will be pricing and selling fuel. Then, navigate to the Design manager found on the merchant portal menu to get started.
Pick your product
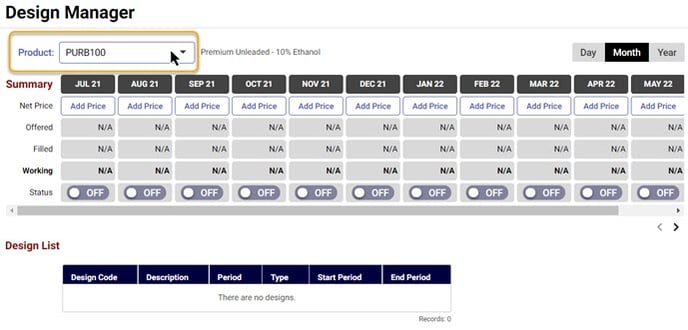
After confirming you are working with the correct facility, start by choosing the product you are ready to price from the drop-down menu at the top of the page. The list of products in this menu corresponds to the products you have added in Merchant Settings > Products tab for the selected facility.
Relative or specific price designs
There are two types of daily prices you can create, relative or specific.
You can create daily specific prices that will be tied to a specific date, or a price that is relative to “today”. Relative prices stay in place as the calendar rolls over – so you’ll always have a price designed or today and you’ll only need to update the price’s inputs as they change. It’s easier to keep relative prices updated, so if you know you’ll be selling this product long term, keep Relative selected.
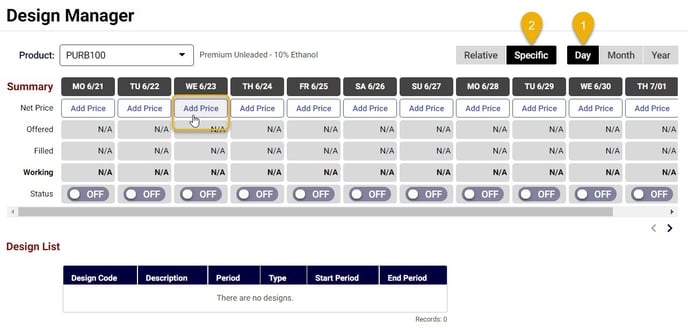
To build a price that will expire as time goes on, click Specific. Specific prices are assigned to a specific date and will roll off the calendar and no longer apply to active pricing as the date ends. You will need to log into the Gasology platform and create a new base price each day you want to offer a product for sale.
Pick the time period
Next, choose Day for the time period you would like to price, and then make a selection for relative or specific.
If you are using a Relative pricing strategy, you can click Save. This will make a price for the current day, which will roll over to tomorrow and the next day. 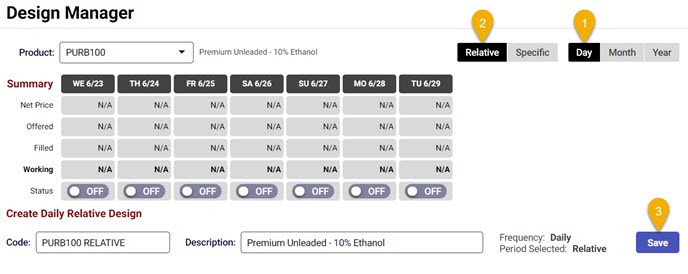
Or, if you are using a Specific pricing strategy, click the Add Price button for the date of your choice. This price will expire after the date passes.
The Design Code and Design Description boxes will be pre-populated with default values; edit these if required (optional). The remainder of this article follows a relative price design.
Click Save.
Note: if you wish to edit a price you have previously created, select it from the Summary table or the Design List on the bottom half of the screen.
After clicking Save, you will be taken to the Blending tab to set the product’s blend components.
Set your product blend
In this step, you will set a price for the actual product itself before adding on adjustments. If required, you will also add any blend components in this step. All prices start here, whether or not you are pricing a blended product.
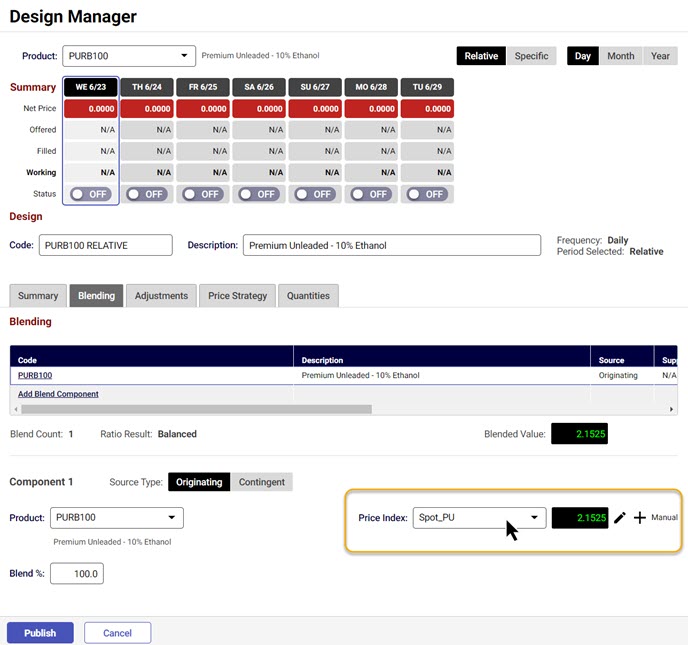
When you arrive in the Blending tab, the product you are pricing will be selected as the first component of your blend. To set the price of this component, you will link a price index to your fuel product that reflects its cost. Indexes are all of the components that, when organized together, create a product base price. For instructions on how to create an index, please visit this article.
Select the desired price index from the drop-down menu. The index value will appear in green text in the black field. To edit an index, click the pencil to the right of the field; remember that edits will be reflected in any designs that use the index throughout the platform. To add a new index from this page, click the plus sign to the right of the black field.
Click Originator if you do not wish to have your price lean on your supplier’s fuel price by pricing contingently. For more information on contingent pricing, visit the linked article.
To add an additional product for blending, click Add Blend Component in the blend table. Then, select the blend product from the dropdown, and select the correct price index for Component 2.
Set the blend percentage (Blend %) of all components, making sure that the percentage total sums to 100. To delete a product component, click the red circle under "Delete" in the Blending table.
Note: keep an eye on blend ratios. Ratio Result automatically adjusts to notify a user if their blend ratio is balanced (or not).
Click the blue Publish button at the bottom of the page after selecting your blend components and setting the correct price index for each.
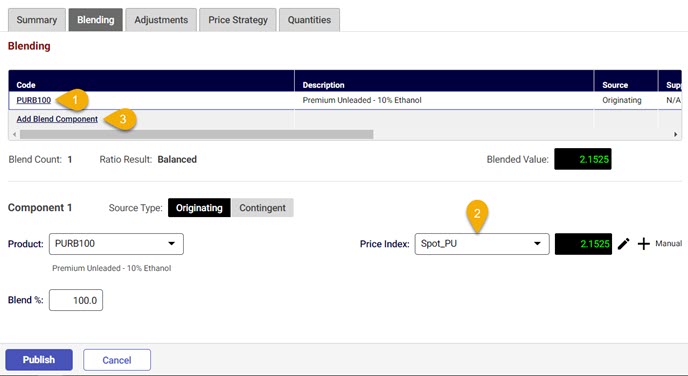
In the following example, we blend premium unleaded gasoline with ethanol for a final mixture that is 10% ethanol.
- Select the source product code "PURB100."
- From the Price Index drop-down menu select the price index that will be linked to the product. Here, the index we created "Spot_PU" denotes premium unleaded fuel.
- You can select either manual or Excel sourced indexes.
- Next, click on Add Blend Component.
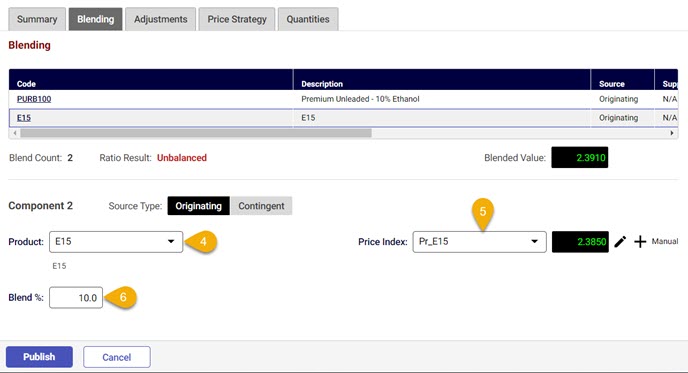
- Now, select the source product for the blending product, ethanol (E15).
- Then select the price index for the product "Pr_E15"
- Enter in 10% for the Blend % field.
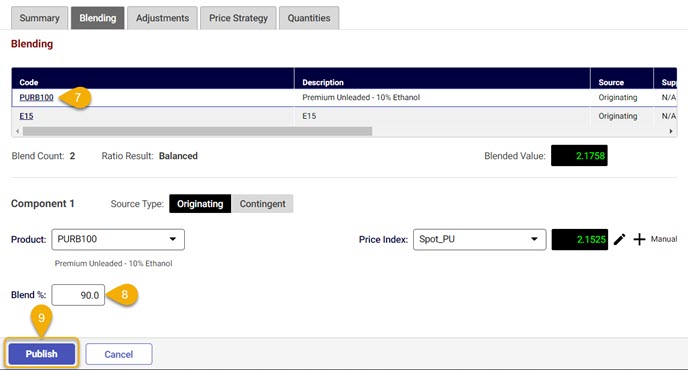
- Now we'll set the blend ratio for component 1. Click on PURB100.
- Then key in 90% for the premium unleaded Blend %.
- Don't forget to click Publish to save your changes.
Add in additional costs
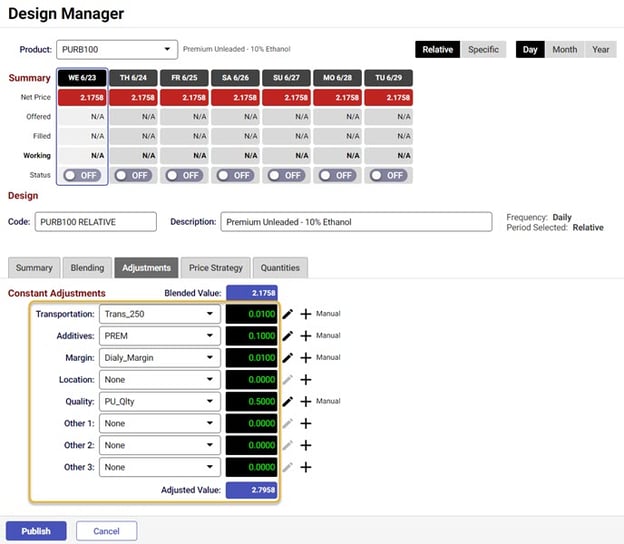
With our product blend set and price indexes selected, any additional costs and margins need to be added to arrive at the final base price. Under the Adjustments tab select the appropriate indexes reflecting any associated product costs.
Possible indexes that can be added include:
- Transportation Index - a cost component reflecting the transportation cost of the product
- Additives Index - an additional cost component based on the price of any additives combined with the product
- Margin Index - an index used to cover the profit requirement for a product
- Location Index - an additional cost adjustment based on the physical location of the product
- Quality Index – a cost component, or price adjustment based on the quality of the product
- Other Index – a versatile catchall index created to meet customer pricing requirements. You may add three ‘other’ indexes.
To adjust your base price by using any of these optional indexes, select the corresponding index from the appropriate drop-down menu. The dollar value will populate in the black field to the right of the menu.
Any index can be edited from this location by clicking on the pencil next to the index value.
Remember: Updating an index used in any price will update the price system-wide, even if the price has already been turned on. This platform feature allows you to rapidly update your product prices by updating only a handful of indexes.
Again, click Publish before navigating away from this tab to save your changes.
Set the quantity offered for sale
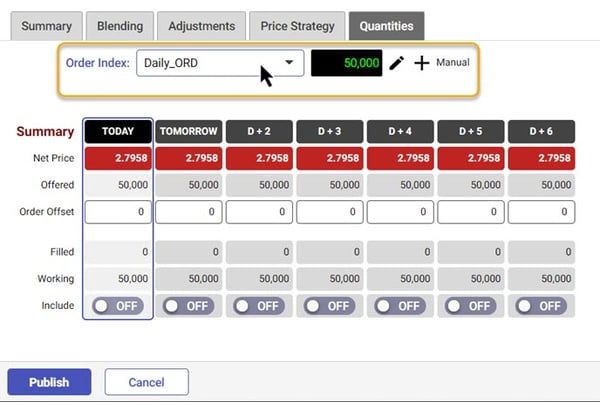
With your daily price designed, the last step in creating your base price involves designating the number of gallons you wish to offer for sale at this price. To set the quantity available for sale, you will use an order index. Just like price indexes, order indexes can be created in the Index manager or by clicking the + button to create a new index without leaving the Quantities tab.
Under the Quantities tab, the Order Index drop-down list contains a list of user-defined order indexes used to set the amount of fuel sold for the period. Set the number of gallons you would like to offer at the designed price by choosing the appropriate order index from the drop-down menu.
Excel index source
The above instructions and examples from previous articles show how to create prices with manual indexes created in Gasology that remain static until edited by the user. It is also possible to use the Gasology Custom Access tools for dynamic index updates. These tools allow you to tie your Gasology indexes to off-platform price indices and are discussed in the second half of this course.
When designing prices and picking indexes, manual and Excel based indexes can be used interchangeably.
Please contact the Gasology support team with questions about using the Excel plug-in, or consult the following article on Gasology’s Custom Access tools.
Next steps
To make your price visible to customers, toggle the price to ON in the Design manager. For more information on activating your prices, visit the linked article.
Gasology also lets you create prices for forward periods; click the link to learn how.
